2014년 12월 10일 수요일

Ext JS 4.1 Performance Preview

Source : http://www.sencha.com/blog/ext-js-4-1-developer-preview/
October 24, 2011 | Ed Spencer

Today we’re excited to release a preview of the performance improvements coming in Ext JS 4.1. We’ve been working hard over the last several months to dramatically improve load time, render and layout performance across the entire framework. For the last several months we’ve been benchmarking and performance tuning with our own examples as well as a number of your apps across a range of browsers, and we’ve made some significant improvements.
Today we’d like to open the current build up to everyone so you can see the speed increase in your own apps. We’d like you to test this release out with your own apps, but want to be very upfront about the nature of this build. This is a pre-beta performance preview and has known issues with some components. We don’t recommend using this in production but we would love to hear its impact on loading, rendering and layout performance in your apps.

What Makes a Web App Fast

When we look at what takes up time in a web application, we find it falls into three main categories:
  • Initialization: setting up all the class definitions and preparing for launch
  • Rendering: creating the HTML markup for all of your components, putting it in the DOM
  • Layout: reading CSS information, sizing and positioning all of the components on the page
Measuring the relative impacts of these three areas is important in understanding what to optimize. We’re going to use the SDK’s Theme Viewer example to demonstrate hard data for this post, but the same general outcome follows all of the examples we have been testing.
The Themes Viewer is pretty heavy–it contains over 300 Components, all rendered to the screen on startup. It’s more complex than most startup screens, even in the biggest apps, so we think it’s a good guide to what happens in highly complex UIs.
All of the numbers presented here are measured on Internet Explorer 8 running on commodity, consumer grade hardware. (We test across a range of browsers and examples but this is a representative example). When we run the benchmarks with this setup on the themes viewer, we find that the page takes 4.5 seconds to finish loading. Obviously, we want to make it faster than that and we set ourselves the ambitious goal of halving the load time.

How We Made It Faster

Obviously, layout is enormously expensive when dealing with screens filled with this many components, but rendering and initialization could be improved too. We tackled each in turn, yielding substantial improvements:

Layouts

Layouts were by far the biggest component of application time in 4.0. Layouts have to do a lot–figuring out the sizes and positions of every Component on the page, allowing for margins, padding and borders specified in CSS, then writing all of those values into the DOM. But by altering the order of operations, we’ve been able to substantially improve performance.
Browsers are optimized to do DOM reads and writes in chunks–so interspersing lots of reads and writes can lead to diminished performance through reflows, repaints and cache invalidations. In 4.0 this was well optimized at the individual Component level but was not well optimized when lots of Components were laid out together.
With 4.1 we have developed a system that batches DOM reads and writes into a small number of read/write cycles, which vastly reduces the number of reflows and repaints the browser has to perform. We’ll be following up with a lot more detail on what’s changed with the layout engine in another blog post.

Bulk Rendering

Moving beyond layouts, we next addressed rendering. Rendering 300 Components in one go is quite demanding of the browser, but just like with layouts we were able to batch together the DOM writes required to render everything to the page. Whereas before each Component was rendered separately, in 4.1 the entire Component tree from the Viewport down is rendered in a single write.
This approach yields another big reduction in startup time. Compared with 1100ms in 4.0, 4.1 renders all 300 of the theme viewer Components in 350ms–that’s a about 1ms per Component, and a 3x speedup over 4.0.7.

Initialization

Finally, we next addressed the lower levels of the framework and optimized a number of functions from the class system through to utilities like MixedCollection. The cumulative effect of these improvements took us from 730ms in 4.0.7 to 300ms in 4.1–again more than a 2x speed-up.

Results

All of this adds up. While Ext JS 4.0.7 took 4.5 seconds to render this large screen full of Components, the Ext JS 4.1 developer preview does it in just 2.2 seconds. This is a 2x speed improvement on this complex example running on IE8.
Themes Viewer load performance on Ext JS 4.0.7 vs 4.1.0
The themes example isn’t the only one that got faster, we’re seeing significant performance improvements across all of our examples and in all browsers. We’ve been benchmarking every single example in the SDK, and when we add together the total load times for each we find significant speed improvements once more:
IE performance on 4.0.7 vs 4.1.0
IE6, IE7, and IE8 performance on Ext JS 4.0.7 vs 4.1.0
These numbers are preliminary, so you should expect them to fluctuate as we lock down and head towards final release. However, our own testing combined with real world verification from a group of advance testers tells us a that we’re achieving substantial performance gains.

Neptune Preview

Neptune Theme in Ext JS 4.1 Developer Preview
While the focus of this release was performance, it’s not the only thing that made it in. At last year’s SenchaCon we demonstrated an exciting new concept theme called Neptune. While it was only a screenshot on a slide, it caused quite a stir and has been one of the most requested features ever since.
Since we first gave a glimpse into Neptune we’ve been iterating like crazy on it. We’ve tested it with the various ways you can put Components together, making sure the colors, margins and borders all look great from netbooks to projector screens. We’re not quite done yet but today we’re excited to be able to release it along with Ext JS 4.1 Developer Preview.
In this preview release we’re targeting modern browsers only–Chrome, Safari and Firefox all look great so for everyone who develops using those browsers (almost everyone we’ve asked falls into this group) you’ll be able to develop using Neptune from day one. As we finalize Neptune based on your feedback we’ll roll out support to older browsers, all the way back to IE6.

Warning–Preview Code

While we’re very happy with the performance improvements we’ve obtained with 4.1, we’d like to be up front about what this release is. We wanted to get 4.1 into your hands so that you can verify the performance improvements in your app and test out the new theme. At the moment we expect that your app will experience visual glitches, odd behavior and even hard JS errors. We strongly recommend against attempting to use this build in production–we’re looking for feedback on performance and Neptune only with this release.
We are expecting some applications to need changes to migrate to 4.1 using this preview–especially if you have written custom layouts and components. This is because we altered some of the low-level architecture of the layout engine, which can have some impact on some more advanced usage of the framework. We will work with you to resolve these issues, and have created a dedicated forum to collect any migration problems you encounter so that we can improve that experience as we approach 4.1 beta.

First Thoughts Learning Ext JS 4.1

source : http://www.sencha.com/blog/first-thoughts-on-ext-js/
January 17, 2012 | Ted Patrick

I wanted to share my thoughts on my progress learning Ext JS 4.1 as a developer new to Sencha. As an application developer I have used many different development environments and application frameworks throughout my career and whenever I learn something new I compare back to my experience. Overall I have been very impressed with Sencha frameworks as they provide a professional foundation to build an application atop.

Interpreted

The single hardest shift for me is embracing the interpreted nature of JavaScript within the Ext JS framework in general. While not new to interpreted systems, I personally expect compiler emitted errors/warnings/flags, syntax auto-completion, and strong typing for member variables, return types and assignments. Having come most recently from Java, I find that being shown errors and autocompletion as I type is a great productivity enhancement but these benefits are tied to the nature of a strongly typed and compiled language. The general lack of these facilities in working with JavaScript is really the first hurdle in moving to web technology. Truth is, as I got more comfortable with the interpreted nature of the the language, I quickly found myself enjoying the advantages:
  • JavaScript’s flexibility is a double edged sword. The language’s freedom is a joy but you must use best practices to avoid common pitfalls.
  • Modern browsers offer developers great insight into application behavior at runtime. I have found the Chrome developer Console and Debugger JavaScript tools to be invaluable.
  • Ext JS uses JavaScript as a meta-language to provide deeper OOP/MVC/Class Loading/Mixin support is very elegant for larger scale application development. These facilities exist in very few frameworks and really differentiate Ext JS and Touch. The ability to extend components or leverage a clean MVC pattern within an application make it very developer friendly as a framework.
  • Leveraging JavaScript object literals and JSON for data/component instantiation is very productive. The ability to load components remotely, define UI as objects at runtime, and leverage client layout templating is very powerful. The syntax of larger object literals using xtype takes some getting used to. I found myself formatting my code more than normal to avoid the dreaded missing comma errors deep within an object literal.
  • Using the Eclipse VJET Plugin was a great productivity boost for JavaScript and Ext JS development. The plugin provides auto-completion for JavaScript and there are several open source syntaxes for Ext JS. Being able to see instances, warnings/errors, and in-context return types is a very pleasant addition based on my past experience. VJET VJET+ExtJS

Ext JS “Standard Library”

Ext JS provides a foundational set of helper classes and methods to make building applications easier. I found that the Ext.Array, Ext.Date, Ext.String, Ext.Object, Ext.Loader classes make working with data very easy and generally simplify building applications. Every application will use these common libraries and having them included and integrated into the framework is great.
Ext.require( [ 'widget.*' , 'layout.*' , 'Ext.data.*' ] ); 
Ext.Array.each( [ 1, 2, 3, 4 ], function( name ) { console.log( name ); });
Ext.Object.getSize( { age:23 , height:6, name:"Ted" } );  //3

Containers

Ext JS provides a rich set of containers (Ext.window.Window, Ext.panel.Panel, Ext.container.Container, Ext.grid.Panel, etc.) to allow developers to easily create nested views and more complex application logic. In Ext JS, containers’ layout behavior is programmatic and allows you to set the behavior of a container at runtime to ‘vbox’, ‘hbox’, or any of the Ext.layout.container types. Additionally you can set sizes dynamically by assigning values to the ‘flex’ property on items within a container.

Xtype

Ext JS provides a loosely typed data format called Xtype to allow you to pass trees of containers and controls as a single object. It is a very, very powerful technique and really makes building lots of UI components at all at once easy. In Flex and Android I used declarative XML for component initialization and layout but these are closely tied into compiler workflow. In an interpreted system, you want to leverage a format that is rapidly parsed and supports remote loading. As Xtype is a JavaScript Object Literal, it is parsed at the speed of the JavaScript engine in use. On both mobile and desktop targets, this is very fast. While you can create components independently, using xtype for component generation is much more productive once you get the hang of it. Here are 3 xtypes passed within an Array:
[ { xtype: 'container', html:'First Item', flex:1 } ,
{ xtype: 'splitter' } ,
{ xtype: 'container', html:'Second Item', flex:1, maintainFlex:true } ]
If this were assigned to a container’s ‘item’ property, it would render a split view. I found this very simple and elegant, compared to the complexity in other frameworks.

Styling

I have styled components in several frameworks. In Ext JS, abstracting style properties as runtime loaded CSS for all components is very powerful. Better still, generating CSS from the providedSASS/Compass source formats makes building a global style change quite easy. In both Flex and Android, style is baked in at compile-time and is less flexible than a runtime interpreted model. While I now feel comfortable generating a base color change in Ext JS, it will take me some time to absorb the finer details of CSS styling of the components. This is easily one of the more complex areas of the framework and will take me time to fully understand.

Hello Sencha

Given this is my first real post on Ext JS on Sencha.com, I thought it would be good to post the simplest example possible. The example creates a window with an image inside. Feel free to paste into a local html file and open in a browser.

  
    Hello Sencha


I will continue to document my journey learning Ext JS and Touch frameworks as I go. There is clearly a lot to learn and hopefully sharing my experience will help others new to Sencha. More to follow.

Optimizing Ext JS 4.1-based Applications

Source : http://www.sencha.com/blog, March 01, 2012 | Don Griffin

Sencha improved performance with Ext JS 4.1, but when it comes to optimal performance of Ext JS-based applications, that’s only part of the battle. The rest comes from optimizing applications for performance, which often includes making a few changes so your code can take advantage of Ext JS enhancements.
We’ll tell you how to do that in this blog post. We’ll also introduce you to a new performance measurement tool releasing with Ext JS 4.1, Page Analyzer. Measurement is key when it comes to improving the performance of your applications. You need to figure out what to measure and how to measure it so you can identify bottlenecks in your code and take the right steps to eliminate them. Page Analyzer helps you do that. Finally, we discuss grid optimization and introduce you to another new Ext JS tool for evaluating grid performance, Infinite Grid Tuner.
As we’ve worked with Ext JS developers, we’ve noticed a few common trends in the way applications are written that provide opportunities for performance tuning. We can’t enumerate every single coding technique that might bog down your application; however, we’ve seen that the way developers use the framework in the following areas can often stand in the way of a high performing application.

General optimization tips

Here are a few things you can do to avoid common areas that slow down Ext JS code.

Check your event listeners

The way your application uses event listeners is a key performance concern. For example, you might set a load event to fire the first time a store gets data. If you’re not careful, that same loadevent might fire every time the store gets new data. Turning that off, and having load fire only the first time the store retrieves data can make a substantial difference in the overall performance of your application. To do this, add single:true to your listener:
listeners: {
    load: onFirstLoadData,
    single: true
}
Another event to be careful of is afterrender, which fires after all DOM elements already exist. Changing elements after rendering causes reflows, slowing your application. Instead, adjust classes and set styles before rendering takes place using beforerender so that the element renders with the correct classes and styles. Some code that must run after render may require the element size to have been acquired. Ext JS 4.1 provides a new event, boxready, which you should consider using if that is the case. It runs after the size of a component has been determined.

Remove doLayout and doComponentLayout calls

Simply put, remove these expensive calls whenever possible. In older versions of Ext JS (prior to 4.0), doLayout was how you told the framework you were done with a component or container and to go ahead and recalculate its layout. Even in Ext JS 4.0, these calls were sometimes needed after direct DOM updates or to work around certain bugs.
With Ext JS 4.1, layouts are triggered differently, so your code should seldom need to call doLayoutor doComponentLayout. If it turns out that these calls are still needed as bug workarounds in your application, please file a bug report so we can fix it.
The only time doLayout or doComponentLayout should be needed for non-bug reasons is when the DOM is directly changed by application code. Since the framework is unaware of such changes, these calls are needed to update the affected layouts.

Reduce container nesting

We often see applications with excessive nesting of containers. For example, there might be a container that owns a single container which owns multiple components where all the work is taking place. You can often eliminate the outer container and accomplish the same thing with one container. It is important to remember that each container takes time to initialize, render, and layout, so the more you can get rid of unneeded nested containers like this, the faster your application will run. Look for code like the following (the “id” properties are seldom seen in practice but are added here to clarify that there are two containers):
{
    id: 'container1',
    items: [{
        id: 'container2',
        items: [{
            id: 'component3'
        }]
    }]
}
If possible, the above should be reduced to a single container:
{
    id: 'container1',
    items: [{
        id: 'component3'
    }]
}

Replace Panels with Containers

Remember that Ext JS Panels are more powerful (and expensive!) than basic Containers. So specifyxtype: 'container' to avoid having your application use the default 'panel', as shown below.
{
    xtype: 'container', // defaultType is 'panel'
    items: [ ... ]
}

Reduce border layout nesting

With Ext JS 4.1, there are many cases where you no longer need to use nesting with the border layout. Removing this nesting will reduce the time to initialize, render, and layout your components. Previous versions of Ext JS required nesting when you needed, for example, to have two or more instances of the same region. You also had to nest border layouts if you needed two North regions above the center region. Now you can just have two North regions as part of the single border layout.
With Ext JS 4.1, regions can be added dynamically when they are needed, instead of having to add all regions up-front and hide them when not in use. You can also use the weight property to give precedence to a region—for example, giving precedence to the West region over the North region. All these changes mean that you should not often need nesting with border layout, speeding up rendering of components that use that layout.

Reduce DOM reads and writes

With Ext JS 4.1, we have tuned how layouts interacts with the DOM to reduce reads and writes wherever possible. You should do the same with your code. DOM reads by themselves can slow an application, but they have especially high-overhead when mixed with DOM writes, as this combination causes reflows. Try to manipulate styles and classes using beforerender so they are rendered with a component instead of changed after rendering. Avoid using setStyleaddCls andremoveCls, and other direct DOM element modifications which cause writes. As a general rule, for better performance, try to manipulate the DOM in batches of reads and writes when writes are needed.

Eliminate extra layouts with Ext.suspendLayouts and Ext.resumeLayouts

Ext JS 4.1 provides two new methods, Ext.suspendLayouts and Ext.resumeLayouts, to help you coordinate updates to multiple components and containers. Adding two items in rapid succession to two containers, for example, causes multiple layout and render operations to be performed. If you use Ext.suspendLayouts before you add these items the framework will no longer perform the layout for each individual item. Once you’re done making your additions, use Ext.resumeLayoutsand the framework will perform a single render and layout operation.
Keep in mind that it is not only adding items to containers that can trigger a layout. Other operations and changes to components and containers will also trigger layouts. It is important to analyze use cases in your application that have performance issues and make sure there are no extraneous layouts being performed.
{
    Ext.suspendLayouts();
    // batch of updates
    Ext.resumeLayouts(true);
}

Introducing the Ext JS Page Analyzer

Ext JS 4.1 includes a new tool to help you look at what’s going on under the covers of an application and measure its performance. You can also use it to quickly measure the performance impact of changes you make to code. Page Analyzer loads Ext JS 4.1 pages and instruments them with diagnostic hooks. The Page Analyzer contains many experimental features, but perhaps the most useful for optimizing application performance is the Layout tab, which we’ll take a look at in a moment.
You can find the tool in the Ext JS 4.1 Examples folder, at the following location in the SDK:
./examples/page-analyzer/page-analyzer.html
Copy the entire “page-analyzer” folder on the server that also hosts the application you want to analyze, since browser security only allows the kind of communication required by Page Analyzer between pages from the same server. Also, be sure the version of Page Analyzer you use matches the build number of Ext JS, since it won’t work if you’re using a different build.
As you use it, remember that this is the first release of the tool and that it’s a work in progress. Please give us your feedback about the tool through the Ext JS forum.
Here’s how to use page analyzer:
  1. Open a browser and enter the URL for Page Analyzer.
  2. When it opens, type in the address of page you want to test.
  3. The page then loads in an iframe, which is why the tool and the application have to be on the same server. Page Analyzer will look something like this when you open the page:
Page Analyzer will look something like this when you open the page:
Page Analyzer will look something like this when you open the page. Click image to view full-size.
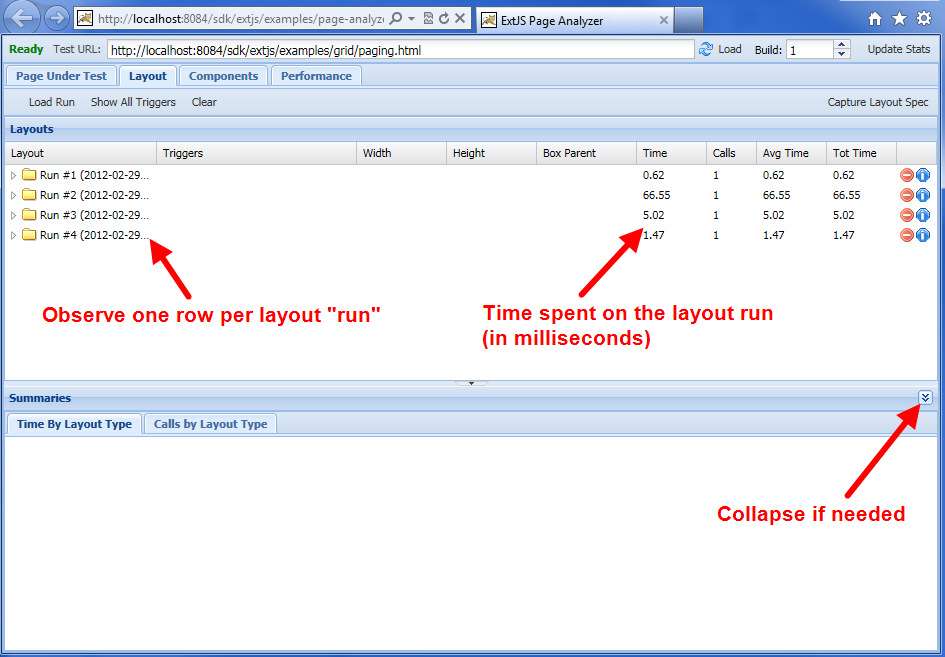
4. Click the Layout tab. You will see a set of layout runs, like this:
Click the Layout tab. You will see a set of layout runs, like this:
5. You’re looking for multiple layouts of the same components. When you find that, go back to your code and see if you can eliminate anything that reduces layouts of that component and improve performance.

Grid optimizations

Ext JS grids can pose a particular problem for web application performance, especially those that represent large data sets. When grids render small data sets, speed is not an issue. However grids with large data sets that call for so-called “infinite scrolling” can pose performance bottlenecks if they’re not created with some care. Infinite scrolling relies on a page cache where a paging scroller object stores pages of the dataset before the user scrolls to the part of the grid that needs to display it.
As the user scrolls, the cached data becomes visible and then disappears off the top of the page and is typically no longer kept in the DOM. The main way to tune this is to keep the DOM size as small as possible, and cache data on the client side to minimize server round-trips.

Scrolling terminology

When a data store is configured with buffered: true, a PagingScroller object is instantiated to monitor scrolling of the View (grids are specially configured data Views), and attempt to maintain a cache of pages ready to provide data immediately it becomes needed as the view traverses down the dataset.
In the diagram below, the user has scrolled the view some way down the dataset. The PagingScroller maintains a leading buffer zone of records ready to render in the direction of travel, and a slightly smaller zone behind the direction of travel.
Buffered scrolling diagram
In the diagram above, the view has scrolled the buffered store.
The PagingScroller requests that the data store ensures that the trailingBufferZone, and theleadingBufferZone are in the cache. This causes the store to calculate which pages that requires, and ensure they are cached. The store only makes Ajax requests pages that are not already in the cache.
As the view scrolls down, the edge of the rendered table almost comes into view. When it isnumFromEdge rows from reaching the edge, the datastore is reloaded with data from further down the dataset, and the vertical position synchronized to keep the visible rows at the same position. When the required data is in the page cache, this operation is instantaneous and invisible. If the scroller is dragged down past the cached pages, an Ajax request will be made, and there will be a LoadMask displayed until the data arrives.
If scrolling proceeds at a reasonable pace, and the leading edge of the “required zone” moves into a page which is not in the cache, an Ajax request is fired off for that page. In most cases, if the leading buffer zone is large enough, it will arrive in the cache before the rows are needed by the rendered table.
By default the page cache only stores the most recently used 5 pages. This can be increased if the dataset will be “browsed”, so that a larger proportion of the dataset is cached in the client, and fewer Ajax requests are made. The store’s purgePageCount controls this behavior.
If the dataset is not unreasonably large—up to maybe 50,000 rows, then it may be desirable to cache the entire dataset on the client. Configure the store with purgePageCount: 0 to never discard pages once they are cached.
How you design this depends on how large the table is that’s being rendered and browser speed. The larger the table, the more it can scroll without having the edge come into view and without having to refresh the data from the prefetch buffer. However, the more data obtained from the prefetch buffer, the longer the delay in re-rendering. You need to maintain a balance between how much data is visible and how frequently re-rendering is required. If your application targets a fast browser, you can display a larger set of rows and data. For slower browsers, display a smaller table with fewer rows that reaches a visible edge more often and has to refresh more frequently
To help you tune grids, Ext JS 4.1 includes an example called Infinite Grid Tuner, which you can find in the Examples directory. Infinite Grid Tuner includes a large data set—50K of records—and lets you set different ways to load the data into the store to prime the prefetch buffer. For example, you can simulate Ajax latency, change the number of rows that are prefetched, and tune the table size. You can experiment with the various parameters, shown on the left of the next image, to see what works best in the browser(s) your application targets.
experiment with the various parameters
You can experiment with the various parameters, shown on the left, to see what works best in the browser(s) your application targets.
Using the Infinite Grid Tuner, you can also adjust the purge page count setting of the store. This sets the amount of data that’s removed from the page cache after it’s been rendered. If you set this number to 0, it keeps all of the data in the buffer, which means that if the user scrolls back up the grid, the data is reloaded without having to refetch data from the server.
Two other concepts to keep in mind as you experiment with the tuner: A grid’s visible data set can be thought of as a sliding window. Similarly, the page cache can also be thought of as a sliding window into all the data associated with the grid. You can change the size of both using the tuner. You can also set the rules for when each is replenished, determining at which point in user scrolling (the number of rows from the visible edge) to request more data for the visible part of the grid and the page cache.